List와 for
- for문과 List는 함께 많이 쓰인다
- List의 멤버함수
- .forEach()
- 변수안의 요소들을 전부 반복문 돌리고 싶을 때
- .map()
- 변수 안의 요소들을 전부 원하는 형태로 바꾸고 싶을 때
- 결과 값의 데이터타입이 Iterable이라서 List로 바꿔주기 위해서 .toList() 멤버 함수를 활용한다
- .where()
- 필터를 걸어서 조건에 해당하는 요소만 남기고 싶을 때
- 필터를 걸어서 조건에 해당하는 요소만 남기고 싶을 때
- .forEach()
var myFriends = ['Teddy','Woody','Cindy','Juno', 'Marco'];

myFriends.forEach((value){
	print({'${value}' 출력})
});

myFriends.map((e){
	return Text(e);
}).toList();

myFriends.where((e){
	return e.length == 5;
});
ListView.builder
- itemBuilder 라는 필수 속성값을 통해 위젯을 생성한다
- itemCount로 몇 번 돌릴 건지 쓸 수 있다
- return 으로 위젯을 반환해준다
- index 값이 하나씩 증가되며 0부터 원하는 수까지 돌릴 수 있다
var myItems = ['아이템1', '아이템2', '아이템3']
...
ListView.builder(
	itemCount: myItems.length,
    itemBuilder: (context, index) {
    	return ListTile(title: Text(myItems[index]));
    }
)
.map()과의 차이점
- ListView.builder은 스크롤이 되는 영역, 사용자가 실제로 눈으로 보는 영역에 화면이 출력될 때만 Widget을 생성하고 .map()은 미리 다 만들어 놓는다
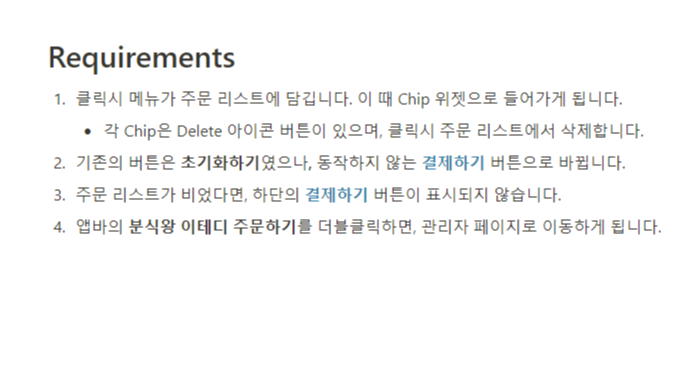
과제 요구사항💻

- 키오스크 앱 업그레이드
💜 코드 및 결과💜
PageView(children: [
          GridView(				// 첫번째 페이지
            gridDelegate:
                SliverGridDelegateWithFixedCrossAxisCount(crossAxisCount: 4),
            children: mathData.map((e) {		// .map() 사용
              return Container(
                margin: EdgeInsets.all(8),
                alignment: Alignment.center,
                child: Text(e.toString()),
                decoration: BoxDecoration(
                  color: Colors.amber,
                  borderRadius: BorderRadius.circular(20),
                  boxShadow: [
                    BoxShadow(
                      color: Colors.black12,
                      spreadRadius: 2,
                      blurRadius: 2,
                    ),
                  ],
                ),
              );
            }).toList(),
          ),
          ListView.builder(			// 두번째 페이지
            itemCount: mathData.length,
            itemBuilder: (context, index) {
              return Column(
                crossAxisAlignment: CrossAxisAlignment.start,	// 왼쪽 정렬
                children: [
                  Container(
                    alignment: Alignment.center,
                    margin: EdgeInsets.all(8),
                    width: mathData[index] * 2,		// mathData안의 수에 따라 너비지정
                    height: 24,
                    child: Text(mathData[index].toString()),
                    decoration: BoxDecoration(
                        color: Colors.white,
                        borderRadius: BorderRadius.circular(16),
                        boxShadow: [
                          BoxShadow(
                            color: Colors.black12,
                            blurRadius: 2,
                            spreadRadius: 2,
                          ),
                        ]),
                  ),
                ],
              );
            },
          )
        ])
- 키오스크 앱 업그레이드
- Chip 생성
ListView( scrollDirection: Axis.horizontal, children: order.map((e) { // map()을 사용하여 order안에 있는 String 으로 Chip 생성 return Chip( label: Text(e), onDeleted: () { order.remove(e); setState(() {}); }, ); }).toList(), ), - order이 비었다면 FAB가 보이지 않음
ListView( scrollDirection: Axis.horizontal, children: order.map((e) { // map()을 사용하여 order안에 있는 String 으로 Chip 생성 return Chip( label: Text(e), onDeleted: () { order.remove(e); setState(() {}); }, ); }).toList(), ), - AppBar의 title을 더블클릭 하면 관리자 페이지로 이동
AppBar( centerTitle: true, elevation: 0, backgroundColor: Colors.red, title: GestureDetector( onDoubleTap: () { Navigator.push( context, MaterialPageRoute( builder: (context) => AdminPage(), )); }, child: Text( '마라왕 신주희 주문하기', style: TextStyle( fontSize: 18, fontWeight: FontWeight.bold, color: Colors.yellow), ), ), ),
본 후기는 유데미-스나이퍼팩토리 9주 완성 프로젝트캠프 학습 일지 후기로 작성 되었습니다.
#유데미 #udemy #스나이퍼팩토리 #웅진씽크빅 #인사이드아웃 #IT개발캠프 #개발자부트캠프 #웹개발 #앱개발 #플러터 #flutter #개발 #안드로이드 #ios #단기캠프

'9주완성! 프로젝트 캠프: 플러터' 카테고리의 다른 글
| [유데미x스나이퍼팩토리] 9주 완성! 프로젝트 캠프: 플러터 강의 - 8일차 과제 (0) | 2023.10.22 |
|---|---|
| [유데미x스나이퍼팩토리] 9주 완성! 프로젝트 캠프: 플러터 강의 - 7일차 과제 (0) | 2023.10.22 |
| [유데미x스나이퍼팩토리] 9주 완성! 프로젝트 캠프: 플러터 강의 - 5일차 과제 (0) | 2023.10.12 |
| [유데미x스나이퍼팩토리] 9주 완성! 프로젝트 캠프: 플러터 강의 - 4일차 과제 (0) | 2023.10.10 |
| [유데미x스나이퍼팩토리] 9주 완성! 프로젝트 캠프: 플러터 강의 - 3일차 과제 (0) | 2023.10.10 |